When it comes to gaming, power and performance are paramount. Gaming laptops have become the go-to choice for users who want high-performance gaming on the go. However, when dealing with legacy systems like Windows XP, you may face challenges in harnessing the full power of your gaming laptop’s hardware. One solution to boost performance and provide greater flexibility is GPU passthrough. This setup allows you to allocate your GPU directly to a virtual machine (VM) running Windows XP, enabling enhanced gaming experiences and performance.
In this guide, we will walk you through the setup of GPU passthrough on a gaming laptop running Windows XP. Whether you’re a retro gaming enthusiast or simply need a more powerful system for your legacy applications, this setup will help you unlock the full potential of your laptop’s GPU.
What is GPU Passthrough?
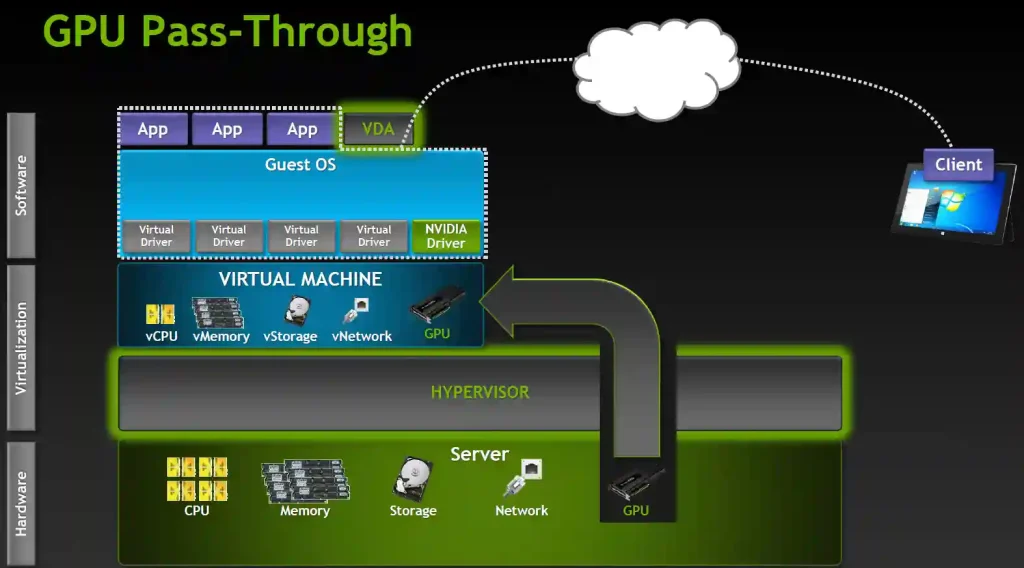
Before diving into the setup, let’s briefly explain what GPU passthrough is.
GPU Passthrough is a process that allows a virtual machine (VM) to use a physical GPU directly, bypassing the host operating system. This enables the VM to benefit from the performance advantages of a dedicated graphics card, which is especially important for gaming or resource-intensive tasks.
For gaming laptops, this means you can run a virtualized version of Windows XP while using your laptop’s powerful GPU. By doing so, you’re effectively isolating Windows XP in a virtual machine, but with the added benefit of accessing your gaming laptop’s full graphics power.
Why Use GPU Passthrough on a Gaming Laptop with Windows XP?
- Leverage Full GPU Power: Running legacy software or games that rely on hardware acceleration benefits from direct access to the GPU.
- Running Multiple Operating Systems: You can run Windows XP for older games or software without sacrificing the host OS’s performance.
- Maximize Hardware Resources: GPU passthrough lets you dedicate resources to the virtual machine, ensuring a smoother experience while keeping your host system stable.
Let’s break down the process to get your gaming laptop set up with GPU passthrough and running Windows XP.
Prerequisites for Setting Up GPU Passthrough on Gaming Laptop
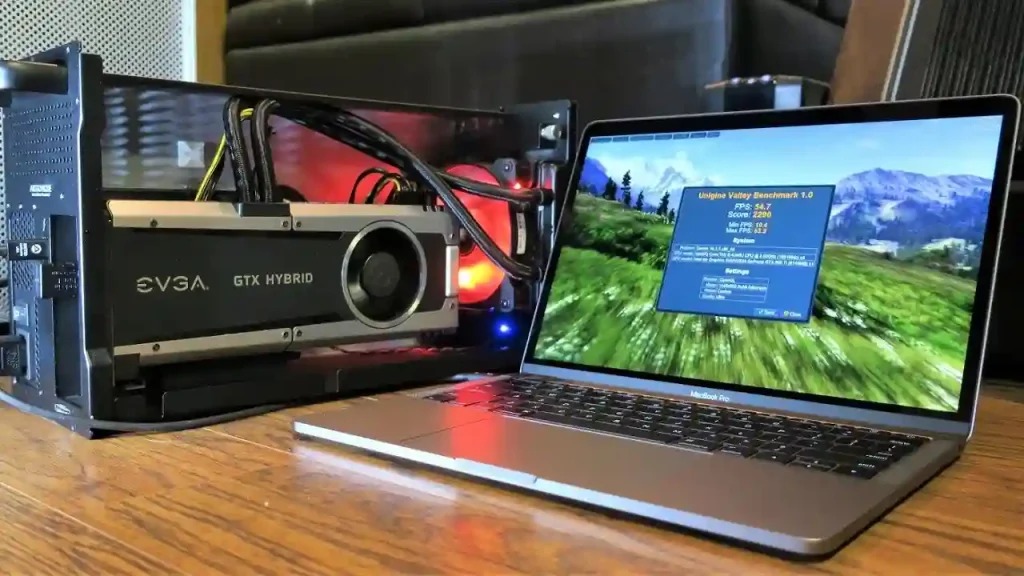
Before proceeding with the GPU passthrough setup, there are a few requirements:
Hardware Requirements:
- A gaming laptop with a dedicated GPU (preferably NVIDIA or AMD).
- Virtualization support (Intel VT-x or AMD-V).
- Sufficient RAM (8GB or more is recommended for both the host and VM).
- A hypervisor like KVM (Kernel-based Virtual Machine) or QEMU that supports GPU passthrough.
Software Requirements:
- Linux as the Host OS: To run a virtual machine efficiently with GPU passthrough, you need a Linux-based operating system as the host (Ubuntu or Fedora are great choices).
- Windows XP ISO: You will need a clean copy of Windows XP to install on the VM.
Drivers:
- Ensure that your GPU drivers are up-to-date.
- Download the necessary Windows XP drivers for the GPU to avoid compatibility issues.
Step-by-Step Guide to Setting Up GPU Passthrough
Here’s how to set up GPU passthrough on your gaming laptop:
1: Install the Host OS
- Install Linux: Begin by installing a Linux distribution like Ubuntu or Fedora as your host OS. You can download the ISO and create a bootable USB drive for installation.
Install KVM & QEMU: After installing Linux, set up the virtualization software (KVM and QEMU). Run the following command to install KVM:
sudo apt install qemu-kvm libvirt-bin bridge-utils virt-manager
- This command will install KVM, which is necessary for creating and managing virtual machines.
2: Enable Virtualization
- Access BIOS/UEFI: Restart your gaming laptop and enter the BIOS/UEFI settings.
- Enable VT-x/AMD-V: Ensure that hardware virtualization (VT-x for Intel processors or AMD-V for AMD processors) is enabled. This is necessary for creating virtual machines with GPU passthrough.
- Save & Exit: Save the changes and exit the BIOS.
3: Configure GPU Passthrough
Identify Your GPU: Use the lspci command to identify your GPU in Linux:
lspci | grep VGA
- This will display the details of your GPU.
- Blacklist GPU Drivers: In some cases, the GPU may need to be unbound from the host operating system to be passed through to the VM. You can blacklist the GPU drivers by editing the /etc/modprobe.d/blacklist.conf file.
Set up IOMMU: Modify the kernel boot parameters to enable IOMMU (Input-Output Memory Management Unit) support. Edit the GRUB configuration file:
sudo nano /etc/default/grub
Modify the GRUB_CMDLINE_LINUX_DEFAULT line to include the following:
GRUB_CMDLINE_LINUX_DEFAULT=”intel_iommu=on” # For Intel
Or:
GRUB_CMDLINE_LINUX_DEFAULT=”amd_iommu=on” # For AMD
After saving the file, run:
sudo update-grub
- sudo reboot
4: Create the Virtual Machine
Install Virt-Manager: Install the virtual machine manager:
sudo apt install virt-manager
- Create a New Virtual Machine: Open Virt-Manager and create a new VM. Select Windows XP as the OS and proceed with the installation. Allocate enough CPU, RAM, and disk space for the VM.
5: Assign the GPU to the Virtual Machine
- Assign GPU Passthrough: In the Virt-Manager interface, select your newly created Windows XP VM. Under the Hardware section, click Add Hardware, then select PCI Host Device and choose your GPU.
- Configure Display and Input: Set up the virtual display, and configure the keyboard/mouse input for the VM.
6: Install Windows XP
- Insert the Windows XP ISO: In Virt-Manager, mount the Windows XP ISO as a boot device for the VM. Start the VM and proceed with the Windows XP installation.
- Install GPU Drivers: Once Windows XP is installed, make sure to install the appropriate drivers for your GPU. You can download these from the manufacturer’s website. This ensures that your virtual machine can utilize the GPU fully.
7: Fine-Tune Performance
- Configure VM Resources: Adjust the VM’s CPU and memory allocation for optimal performance. Allocate more resources to the VM if necessary.
- Enable 3D Acceleration: In the VM settings, enable 3D acceleration to enhance the gaming experience.
Tips for Improving Performance

- Use a Dedicated GPU: For better performance, dedicate a discrete GPU (NVIDIA or AMD) to the VM, leaving the integrated GPU for the host OS.
- Optimize VM Settings: Adjust the virtual machine’s CPU and memory allocation for smoother performance.
- Install DirectX: To improve compatibility with older games, make sure to install the appropriate version of DirectX in your Windows XP VM.
- Use a High-Quality Display: Ensure that your laptop’s display resolution matches the resolution settings in your virtual machine for the best visual experience.
Common Issues and Troubleshooting
- Performance Drops: If you notice a decrease in performance, check whether the GPU is being properly passed through to the VM. Revisit the IOMMU and PCI device settings.
- Windows XP Compatibility: Some newer GPUs may not have native support for Windows XP. Ensure you are using compatible drivers for the best performance.
- Driver Issues: If the GPU isn’t recognized in the VM, recheck your installation of GPU drivers in both Linux and Windows XP.
Conclusion
Setting up GPU passthrough on a gaming laptop running Windows XP can significantly enhance your experience, especially if you’re trying to run legacy games or software that demands hardware acceleration. By following this guide, you’ll be able to take full advantage of your gaming laptop’s GPU and enjoy the best of both worlds: the power of modern hardware combined with the nostalgia of Windows XP.
With a bit of patience and attention to detail, GPU passthrough will provide an exceptional gaming experience for your virtualized Windows XP system, bringing performance and functionality to new heights!
ReadMore: 8845H vs Other Processors: Which Is Better for You?


